A graduated neutral density filter is a really handy tool for landscape photography. It allows you to balance the light levels between a bright sky and darker ground, giving a photo which is well exposed and full of detail in all areas.
If you don't own a grad ND filter, or if you forgot to take it with you on your last photography outing, then all is not lost - you can recreate the effect quickly and easily in Photoshop. What's more, you can control the graduation more accurately, allowing you to decide exact where the filtering will start and end.
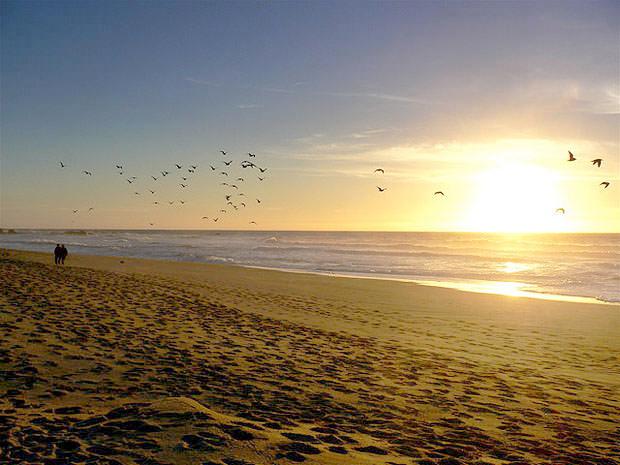
For this tutorial I'll be using the following image. It's a stunning shot but it could do with a little bit of tweaking to lighten up the sand and bring out some of its details. I recommend saving this image (or using your own) and following along with the steps below.
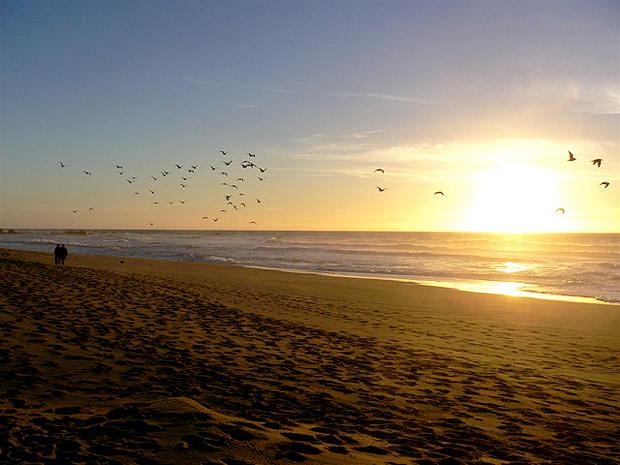
The photo we'll be adding a "virtual" graduated ND filter to. Image by Buzz Andersen.
1. Adjust the Highlights
Open your image in Photoshop. Double click on the "Background" layer to convert it to an editable layer. Name it "Highlights".
Next, apply a Levels adjustment layer by going to Layer > New Adjustment Layer > Levels, and naming it "Highlight Levels". Drag the centre slider until the bright parts of the photo (the sky) look nicely exposed; don't worry about the dark areas, we'll deal with them in a moment. I've darkened my sky slightly by dragging the slider to a value of 0.9.
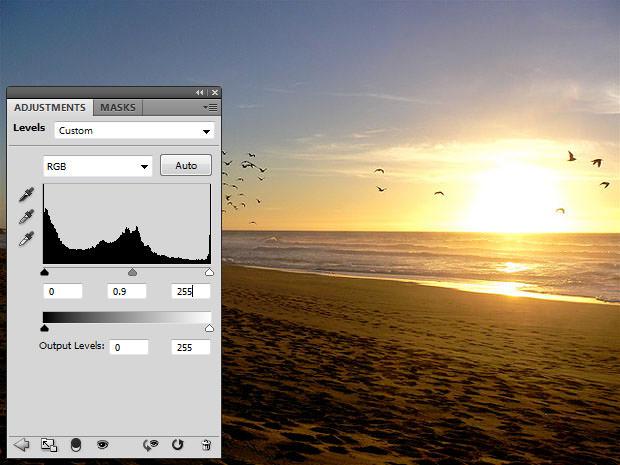
Adjust the highlights (the sky).
2. Adjust the Shadows
Right-click on the "Highlights" layer and select "Duplicate Layer". Name it "Shadows" and click "OK". In the Layers panel, drag this new layer to the top of the stack.
As before, apply a Levels adjustment to the image, naming it "Shadow Levels". This time, adjust the middle slider to make the dark parts of the scene (the sand) look good. I've chosen a value of 1.7, which brightens up the ground nicely.
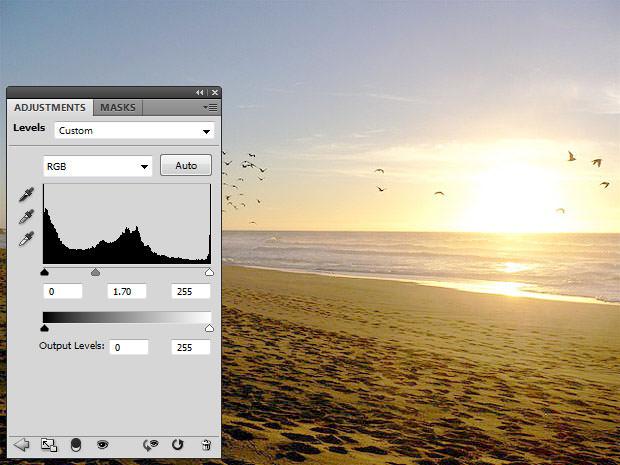
Adjust the shadows (ground).
3. Lock the Adjustment Layers
Before going any further we need to "clip" the two adjustments layers to their respective image layers. This will make sure that each adjustment layer only affects its own image layer, rather than affecting the entire image.
In the Layers panel, make sure the "Highlight Levels" adjustment is positioned directly above the "Highlights" layer. Click on the adjustment layer, hold down Alt/Option, and click the line between it and the "Highlights" layer. You should see a downward-pointing arrow appear next to the "Highlight Levels" adjustment to show that it is now clipped to the "Highlights" layer below.
Repeat the process with the "Shadows" and "Shadow Levels" layers.
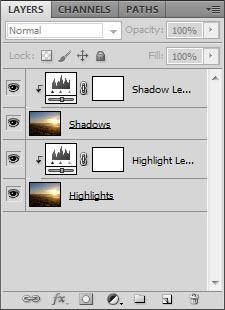
Clip the adjustment layers to their respective image layers.
4. Blend the Layers Together
Now that we have our 2 images (one adjusted for highlights and one for shadows), it's time to blend them together into an image which has good exposure all over.
Click on the "Shadows" layer and add a layer mask (Layer > Layer Mask > Reveal All). Select the gradient tool from the tools pallette and make sure it's set to go from black to white.
With the layer mask selected, drag a gradient from near the top of your image to near the bottom (hold Shift to make it perfectly vertical). When you release the mouse, you'll be left with a photo which is well exposed all over, just like you'd get from a real graduated ND filter.
The adjusted image, showing good detail and exposure throughout, just like with a real graduated neutral density filter.
It's a good idea to draw your gradient a few times in different places to see what looks best. In the end I settled on one that started about 1/4 of the way down from the top of the frame and ended about 1/4 of the way up from the bottom.
5. Adjust the Overall Contrast
Your image should now be showing good detail in all areas, but it can sometimes look a bit "flat" at this stage, so I like to increase the contrast slightly.
Select the top layer in the Layers pallete (it should be the "Shadow Levels" layer) and add a new curves layer above it by clicking Layer > New Adjustment Layer > Curves.
In the control panel, tweak the RGB curve into a slight S-shape. This increases the overall contrast of the photo and gives it a bit more impact.
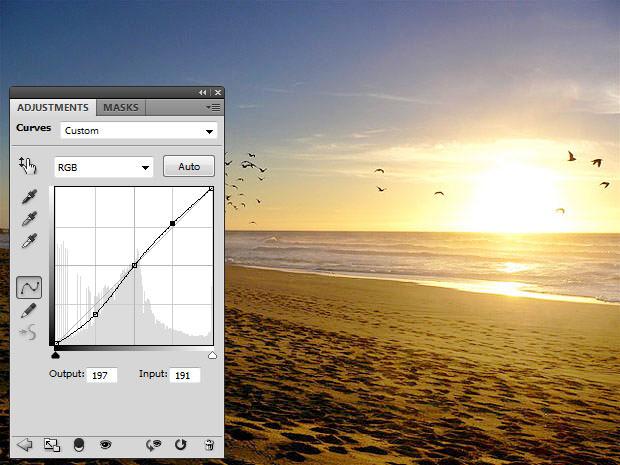
Use curves to increase contrast slightly.
That's it! Your photo should now be looking much more evenly balanced. If there are any areas you're not happy with, you can tweak them by selecting the relevant adjustment layer and changing its settings. Here's a comparison of the original and final images:

The original image (left) has a less saturated sky and is lacking detail in the sand. The final image (right) shows a more even exposure, richer colours, and improved definition throughout.
Applying a digital graduated neutral density filter in Photoshop is a powerful way to fix exposure problems in your photos. It also gives you much more control over the effect than using a real filter, allowing you to tweak and adjust it until it looks just the way you want it.