Traditional photography forces us to choose between colour and black and white at the time of shooting. Digital photography removes this limitation, allowing us to shoot in colour and convert to black and white later.
This flexibility allows us to compare the same photo in both forms, so that we can choose the one with the most impact. It also allows us to tweak the way our shot's colours are converted, so that we can produce the exact effect we're after.
There's more than one way to convert a colour photo to black and white using Photoshop, but the method I discuss here will give you the most control over the final image. This will help you produce the exact effect you're after and end up with the best results.
Digital Black and White the Wrong Way
Two of the most commonly used methods of shooting digital black and white photos are either by using the in-camera "black and white" mode, or by using the "greyscale conversion" option in your graphics software. However, both of these tend to be very simple conversions, and usually leave us with an image which is flat and bland.
Digital photos are composed of three channels - red, green and blue. The greyscale version of each of these channels looks different, bringing out texture and detail in different areas. Black and white camera modes and software greyscale conversions work by either combining equal amounts of these channels, or even worse by just discarding two of the channels and using the greyscale of the remaining one.
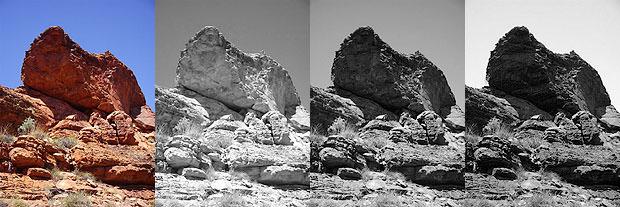
Left to right: RGB colour, Red channel, Green channel, Blue channel. Note how each channel produces a very different greyscale image.
Ideally we would like to have full control over which channels are used in producing our black and white image, and the proportions in which they are mixed. Thankfully most graphics programs, such as Photoshop and GIMP offer a tool to do just this - the Channel Mixer.
Converting to Black and White Using the Channel Mixer
I've written this tutorial specifically for Photoshop, but it works in almost exactly the same way in any graphics program, so you'll still be able to follow along:
Start by loading in your colour image.
Begin by taking a look at each of the three colour channels, just to get an idea what they all look like, and to see if there are any which look better than the others. Press Ctrl+1 to display Red, Ctrl+2 to show Green and Ctrl+3 for Blue. Press Ctrl+~ when you're done to switch back to colour mode.
Now that we have seen our three channels it's time to convert our image to black and white by using a combination of them.
Go to Image > Adjustments > Channel Mixer. You will see the following dialogue box:
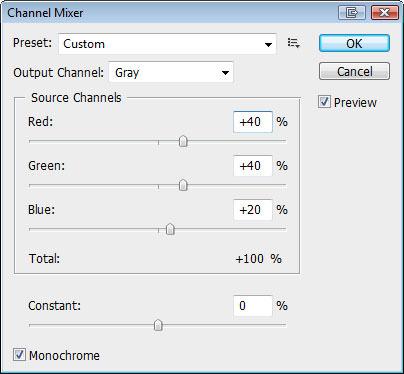
Photoshop's Channel Mixer dialogue box.
Tick the box at the bottom which says "Monochrome". You should see your image change to black and white.
Next, adjust the three sliders labelled Red, Green and Blue until you get an image that you like. The "best" settings depend on the image and your personal taste, but keep their total around 100%, otherwise you'll lighten or darken the image. If you do find that your total is too high or low, you can use the Constant slider beneath to compensate.
Notice that you can even set channels to negative values, which can produce some interesting effects.
When you're happy with your image you can click ok and save your newly converted black and white image.