In photography, a "stop" is a widely misunderstood concept, feared by many because it sounds so complicated. However, it's actually very simple:
A stop is a doubling or halving of the amount of light let in when taking a photo.
For example, if you hear a photographer say he's going to increase his exposure by 1 stop, he simply means he's going to capture twice as much light as on the previous shot.
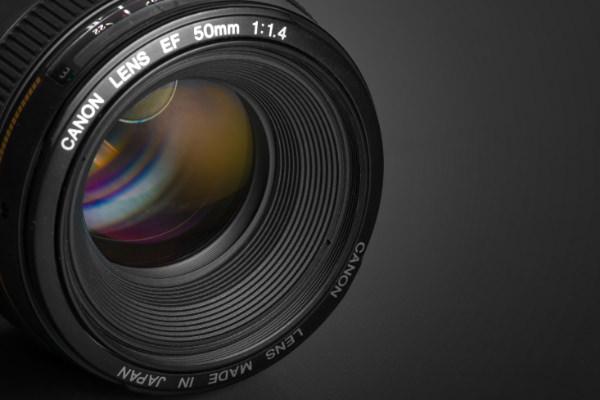
A stop is a measure of exposure relating to the doubling or halving of the amount of light. Image by Hamed Saber.
The amount of light captured while taking a photo is known as the exposure, and it's affected by three things - the shutter speed, the aperture diameter, and the ISO or film speed. These are all measured using different units, so the concept of "stops" was invented as a convenient way to compare them.
Stops and Shutter Speed
Shutter speed measures how long your camera's shutter is left open during a shot. The longer it's open, the more light it lets in, and the greater your total exposure will be. Doubling or halving your shutter speed produces an increase or decrease of 1 stop of exposure.
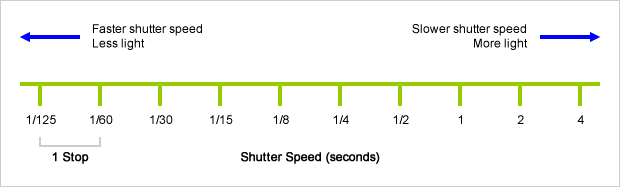
Common shutter speed stops.
For example, changing from 1/100 of a second to 1/200 lets in half as much light, so we can say we've decreased the exposure by 1 stop. Similarly, going from 1/60 to 1/30 lets in twice as much light, giving a 1 stop increase in exposure.
Most cameras allow you to adjust shutter speeds in increments of 1/3 of a stop, so 3 turns of the dial either way will adjust your exposure by 1 stop.
Stops and ISO Speed
ISO speed describes how sensitive your camera's sensor is to the light that hits it. A more sensitive sensor will produce the same overall exposure from less light, meaning that you can use a narrower aperture or faster shutter speed in the same conditions.
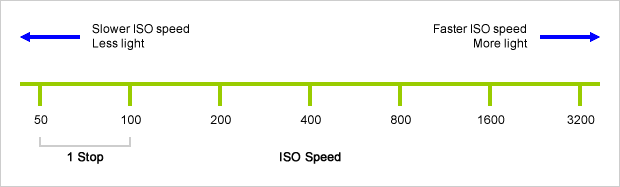
Common ISO speed stops.
ISO is measured using values that correspond to the ASA scale for film, with a higher ISO number relating to a more sensitive sensor. As with shutter speed, doubling the ISO number gives an increase of 1 stop, while halving gives it a decrease of 1 stop.
For example, switching from ISO 100 to ISO 200 doubles the sensor's sensitivity, producing a 1 stop increase. Moving from ISO 800 to ISO 400 is a 1 stop decrease. Most cameras let you change ISO speed in increments of 1 stop.
Stops and Aperture Diameter
Aperture is measured using the "f-number", sometimes called the "f-stop", which describes the diameter of the aperture. A lower f-number relates to a wider aperture (one that lets in more light), while a higher f-number means a narrower aperture (less light).
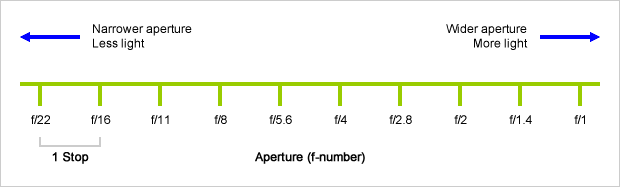
Common aperture stops.
Because of the way f-numbers are calculated, a stop doesn't relate to a doubling or halving of the value, but to a multiplying or dividing by 1.41 (the square root of 2). For example, going from f/2.8 to f/4 is a decrease of 1 stop because 4 = 2.8 * 1.41. Changing from f/16 to f/11 is an increase of 1 stop because 11 = 16 / 1.41.
As with shutter speed, most cameras let you control your aperture in 1/3 stop increments.
Stops are Interchangeable
The great thing about stops is that they give us a way to directly compare shutter speed, aperture diameter, and ISO speed. This means that we can easily swap these three components about while keeping the overall exposure the same.
Let's say you're shooting a scene using a shutter speed of 1/60 of a second, an aperture of f/8, and an ISO of 200. You find that while the scene is well exposed, your subject is turning out a bit blurry, so you decide to increase the shutter speed to 1/120 of a second.
This change of 1 stop will result in the next photo coming out dark, because you're now letting in half the total light as before. In order to correct this, you need to reclaim that 1 stop reduction from somewhere else. Now that we have a way of comparing settings, this is simple.
You could open the aperture wider to let in more light - moving from f/8 to f/5.6 is an increase of 1 stop, so we've got back to our original exposure. Alternatively you could double the ISO speed from 200 to 400, again resulting in a 1 stop increase.
As you can see, stops are a really easy way of adjusting our camera's settings while making sure we don't ruin the photo's overall exposure.
Considerations when Adjusting Exposure
When adjusting the three components of exposure you should be aware that each one affects your photos in other ways, which may not always be desirable:
Shutter speed - If your shutter speed is too slow your photo may blur, either from movement of the camera or movement of the subject.
Aperture - A wide aperture produces a narrow depth of field, so if you make it too wide you may have trouble keeping everything in focus. On the other hand, a narrow depth of field can help to isolate the subject, and is often something that you want; if so, you need to avoid using a narrow aperture.
ISO speed - The more you increase your camera's ISO, the more digital noise your photos will exhibit. This can make your image look grainy and reduce its sharpness.
As with everything in photography, adjusting these three settings is a balancing act. You need to decide what effects you want in your shot and choose settings that will produce them while minimising the potential downsides. Exposure stops are a really useful tool for doing this, helping you swap settings around with ease and giving you more control over your scene.